
make money with food photography

If you have always dreamed of being able to stay home with your kids and still help your family, YOU CAN as a food photographer for bloggers.
Free video training!


Oct 18, 2024
How to Photograph a Recipe Step 3: The Process
Quick disclosure: This page contains affiliate links which means we may receive a commission when you use our links.
We are close to completing our delicious angel food cake in our “How to Photograph a Recipe” series. In Step 3 of 4, we’re diving into the nitty-gritty details of food photography. If you want to skip ahead, you can watch the video here. But if you're going to follow along in the blog, we’ve got a lot to cover today.
In Step 3, we discuss composing the ingredients and process shots, using white balance, playing with angles, photographing each step, and more. Today is all about the step-by-step details of food blog photography, so go slowly, take notes, and enjoy the journey!
Understanding Food Blog Photography
Before we overwhelm you with the specifics of how to photograph a recipe, let’s discuss food blog photography itself. Once you understand why we take the photographs that we do and the idea behind using specific techniques, you’ll feel much more confident in the process.
We promise there is a well-thought-out and planned method to our madness!
What is Food Blog Photography
If you want to know how to photograph a recipe for blogs, the keyword is “education.” We are educating readers on exactly how to make a recipe. It’s not abstract; it’s detailed. This means your photography should highlight certain elements that would be helpful to a home cook, such as batter texture, ingredient mix stages, and so much more.
Think about it like tutorial-based food photography. You are not selling a magazine; you are teaching people how to make or create something!
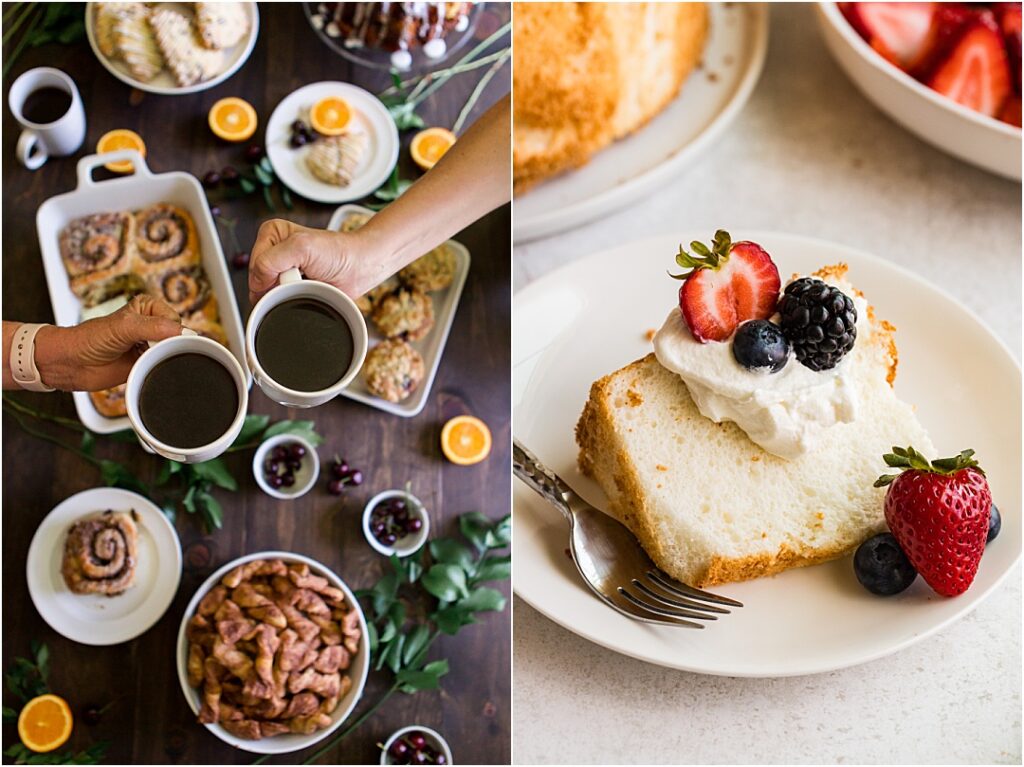
Editorial photography is very different. The photos are no doubt gorgeous, but they focus on the composition of the entire scene. They want to capture the eye just like a runway model in haute couture. Food blog photography is based on realism. We focus on the food itself, not the scene. Our ultimate goal is a successful recipe and a perfect end result.
How to Photograph a Recipe Step 3: Composing Ingredient and Process Shots
So, how do you get realism across in your photos? It’s not as complicated as you might think. We follow a process for every recipe. Let’s get into it!
The Ingredients Shot
The ingredients photo is the first photo you will take in your set and one of the most important photos you’ll take. Bloggers use this photo at the very beginning of their recipe blog, and it can determine whether or not a baker/cook keeps reading.
So, what should you keep in mind for the ingredients photo? We discussed some of this in “How to Photograph a Recipe: Step 2,” but we’ll cover it again and in more depth now. Here’s what you need to know.

- Plenty of space should exist between each item in the photo so the blogger can label the ingredients as needed.
- Use bowls and plates of different sizes and styles (design or texture) to make the photo interesting. For example, use a mini pie plate with a ruffled edge for the flour while using a standard bowl for the sugar.
- Measuring cups and spoons should add color and interest to the ingredients. Choose matching items, all in one color—such as gold, bronze, or rose—to break up the white on white of the bowls and plates.
- Play with the placement of the measuring cups, the arrangement of the bowls, and the mounding of the ingredients to add layers (depth) to the photo.
- When arranging items, look for movement throughout the photo. Ensure your eye has a path to follow to each item without getting lost.
Yes, the ingredients photo can be boring, but it can still turn out amazing if you follow our tips and tricks.
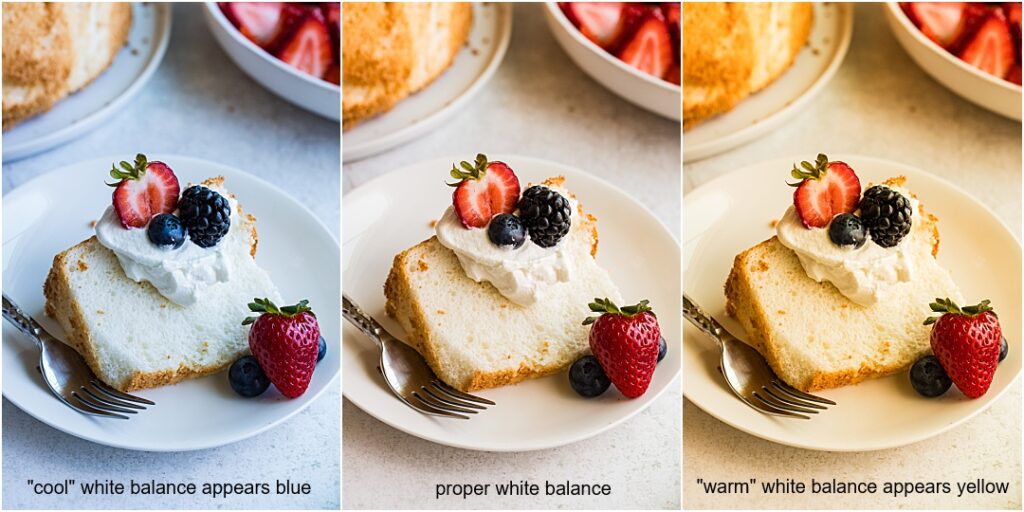
Setting the White Balance
Once you have the ingredients staged the way you want, it’s time to take the photo. The first step is to set your white balance. When done correctly, you will save much time editing the result. An ExpoDisc can be incredibly helpful for this!
We go into white balance in extreme detail in our Pretty Focused course. You’ll take multiple lessons and even more practice shots to perfect your white balance. So, if you want to know all the ins and outs of how to photograph a recipe with the appropriate white balance, sign up today.
Getting the Angles Right
Taking a food photo isn’t as simple as standing before your staged ingredients, whipping out your iPhone, and snapping a picture. The right angles are essential for solid composition. So, what angels should you be looking for?
- In many cases, you’ll want to come in from above. Grab a stool or a ladder to stand above the ingredients and take your photo from an aerial viewpoint.
- Think about the texture of what you’re photographing. Get up close, and take a photo at a forty-five degree angle. The goal is to capture the texture in the best light.
- Take three different angled shots of each step. I typically photograph an overhead, close-up and forty-five degree angle.

Experimentation is a good thing when it comes to angles. You never know what photo will turn out best or what viewpoint will be most effective.
Check out how to launch a career in food photography today!
Photographing the Step-by-Step Process
It will seem weird at first, but when photographing a recipe, you want to think in small, incremental steps. Again, if the purpose is education, you don’t want to skip a step or combine too much at once, confusing the reader. But this can take some detailed planning and time. So, how do you go about it?
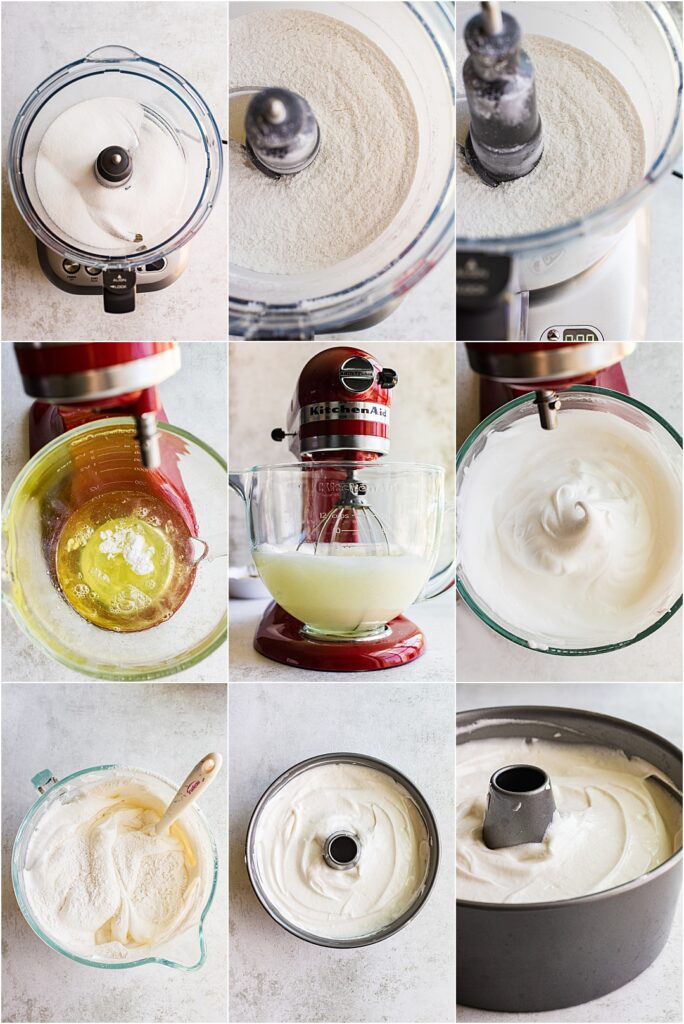
- First, bring all the equipment you’ll need for the recipe (food processor, scale, mixer, bowls, spatulas, etc.).
- Next, read the recipe as slowly as possible and map out each step. For example, step 1 is adding sugar to a bowl, step 2 is cracking the eggs, step 3 is blending the sugar and eggs into stiff peaks, step 4 is…
- Complete the recipe's first step (pouring sugar into the food processor) and then freeze!
- It’s time to compose a photo and take a picture. You might need to move items around or bring empty bowls into or out of the picture, but try to compose a focused shot with an interesting but not distracting background.
- Once you have a few photos you like, move on to step 2 in the recipe. Repeat numbers 3-5 above until you have finished the recipe.
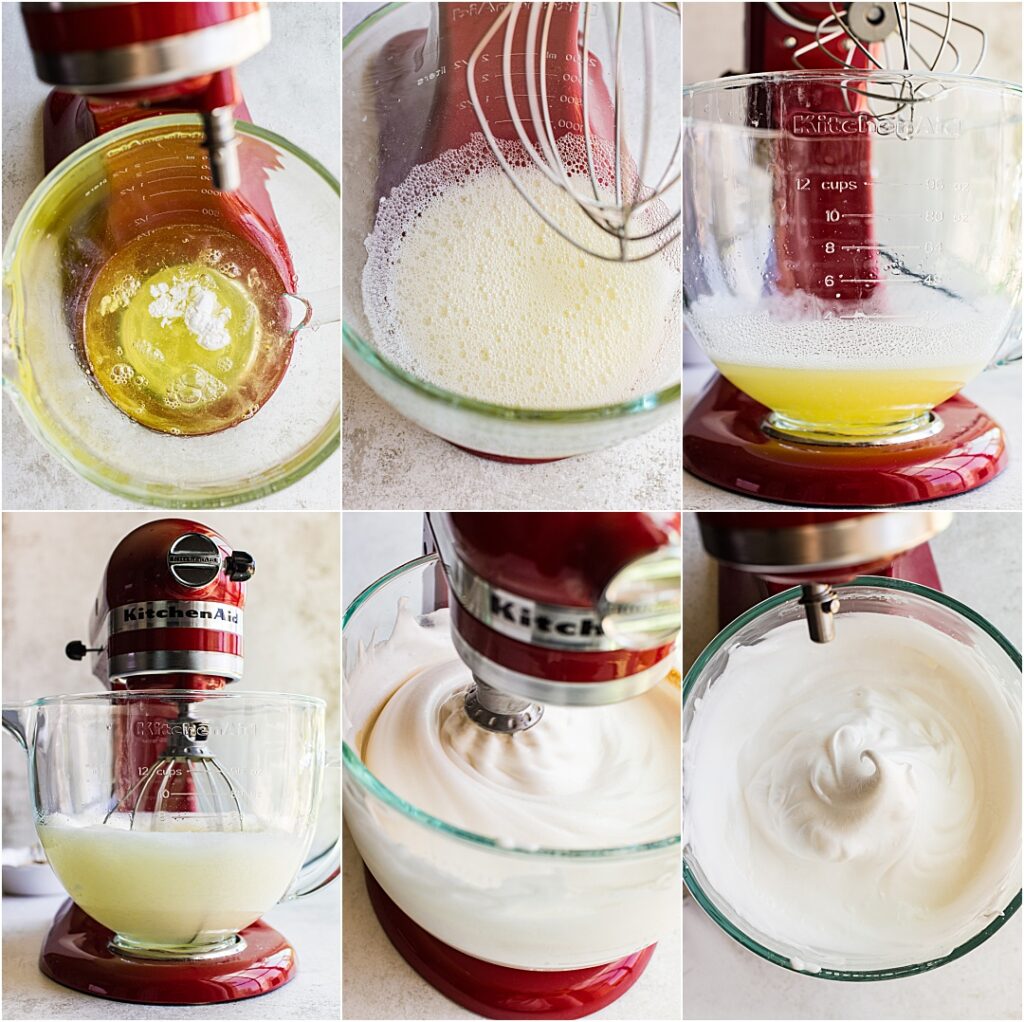
And don’t be afraid to pause the recipe in the middle of a step! For example, if you need to whip egg whites, pause to take photos at the frothing stage, then keep going, pausing to take photos as the eggs get increasingly whipped. The final egg photo should demonstrate the ideal texture of stiff peaks so bakers know what their results should be!
Food Blog Photography Process Tips and Tricks
That’s it for “How to Photograph a Recipe: Step 3.” Next, we’ll dive into Step 4 on our blog and discuss photographing the heroes—the most crucial step. If you don’t want to wait, you can watch it here.
For now, we’ll leave you with a few tips and tricks for photographing the ingredients and recipe process.
- Take Test Photos and Re-evaluate: Only some photos will turn out perfectly the first time; they most often don’t. So, don’t be afraid to take test photos, look at the results, and see what you need to change.
- Odds Are Your Friends: A good rule of food photography is to have odd-numbered items in your photo: five points of interest instead of four. It is more aesthetically pleasing and helps draw your eye around the image.
- Use Clear Bowls: If you have a KitchenAid mixer or other tools with bowls, use clear glass bowls whenever possible. A clear bowl gives you so many more photography opportunities.
- Take Advantage of Overhead Shots: Most recipe photos will be shot from overhead because tutorial-based food photography focuses on realism. After all, home chefs will be looking down as they cook, so an aerial image best represents their viewpoint.
Are you ready to take your food photography to the next level with Pretty Focused? Sign up for free training today!

Pretty Focused Founder | I’m a wife, educator, photographer and homeschool mom. I created my own dream job working from home and now teach others how to turn their passions into creative businesses.


PRIVACY / disclaimer / accessibility / Code of conduct / Earnings Disclaimer / Be an Affiliate
melodee lynn photography llc - Copyright 2026
www.PRETTYFOCUSED.COM / PSALM 90:17
melodee lynn photography llc
Copyright 2026
www.PRETTYFOCUSED.COM
PRIVACY / disclaimer / accessibility Code of conduct / Earnings Disclaimer
Be an Affiliate / PSALM 90:17